I had some offer some other great suggestions on how to get bows to stay on an infant heads.
Betts Family offered this great advise:
If you live in a humid place like I do in Seattle Karo and KY don't work as well as in dry places so I discovered that a traditional Elmer's glue stick works wonders. . .bows stick all day and it washes out with water! I love the looks when you're caught glue-ing a bow on a babies head! I love your blog thanks for all the fun ideas.
I wanted to thank Betts family for giving us this information. I live in such a dry climate I hadn't thought about the humidity.
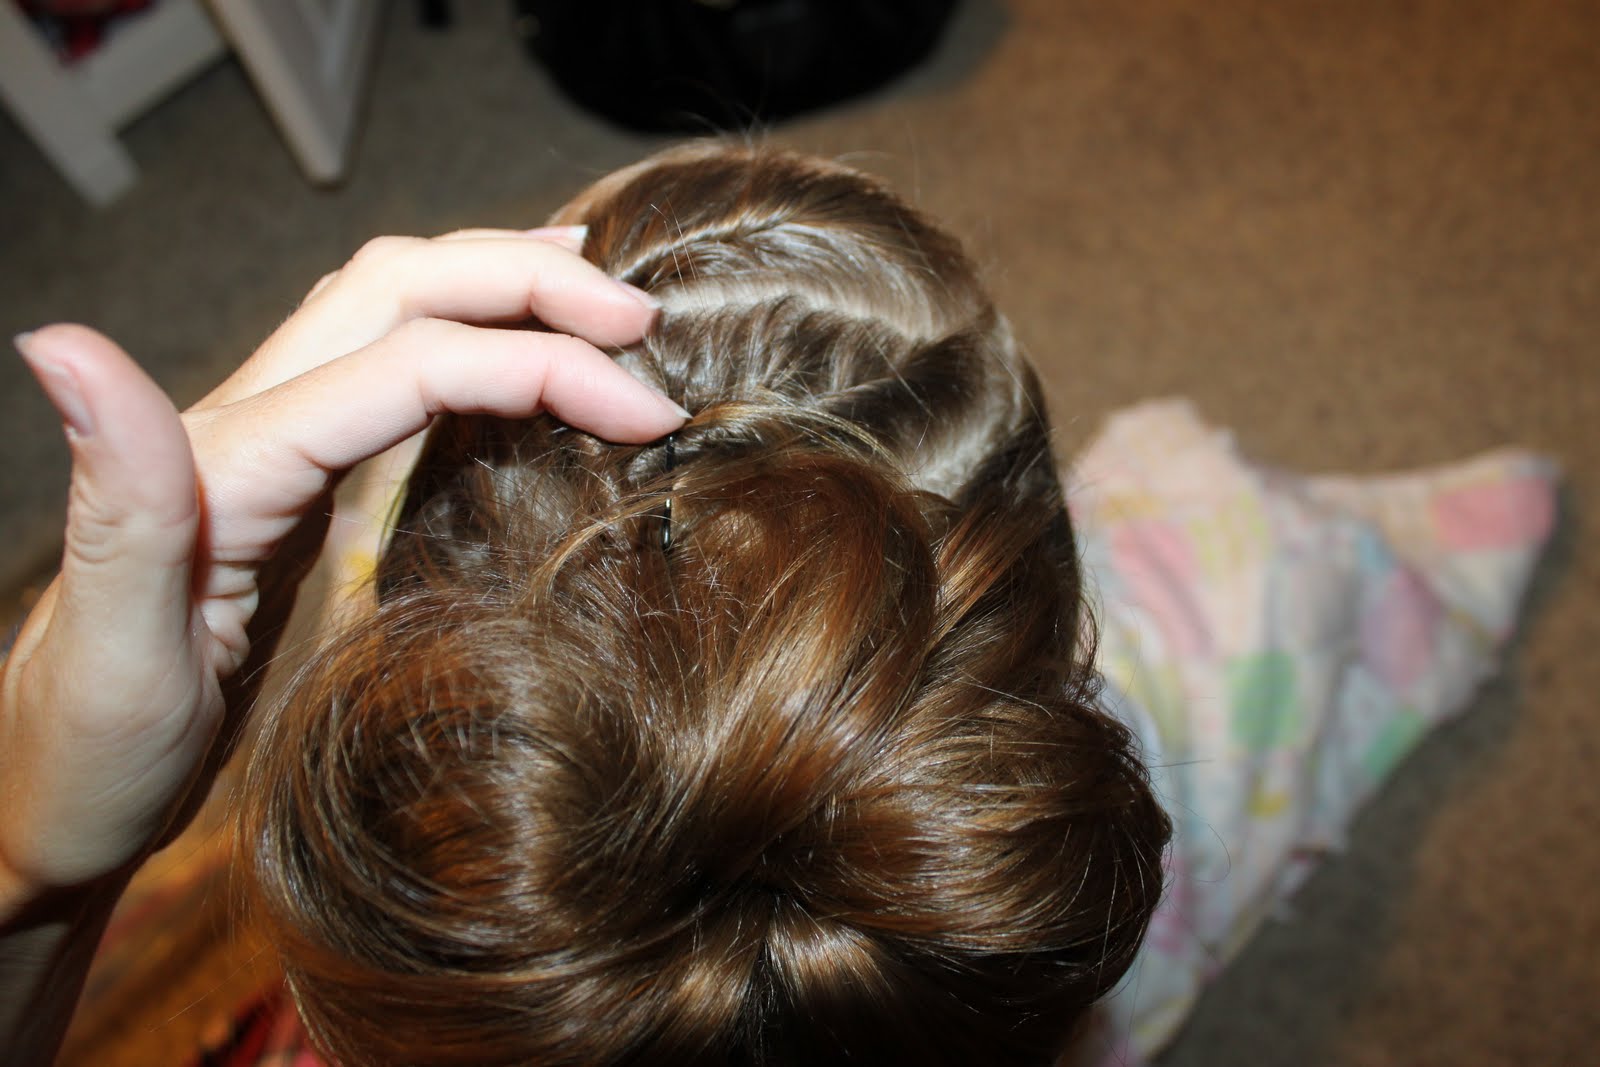
Lauren's Double Braids from Make it or Break it

Another fun Make it or Break it hairstyle from Lauren.
Make a center part and make large part french braid as shown below.

Make another french braid as described above. Below is a picture of what I did.

Then pull all the hair into a ponytail.

Top view

Side View

The Messy Bun Step by Step Instructions

Recently I have had a lot of people asking me about my messy bun. So here goes if these are not clear please ask questions I will do my best to explain what I do.
Because we don't just like plain messy buns at our house you will get a few instructions on rolls for the front of the hair.
I first made a roll across the front of her head this pulls all the bangs out of her face.
I then made a 2nd roll and 3rd rolls as shown below. 1 almost parallel to the first and the 2nd to make a t. I secured them in place with small bobby pins

Then I made 3 more rolls. Another one parallel to the 2nd roll and one that follows the t shaped one. The last one is parallel as shown below. (I hope all that made sense if not try and look at the picture)

Now to start the messy bun. Take all the hair and put it into a ponytail. Don't pull the hair all the way through on the last loop of your elastic.

The back of the hair will look like this after all the hair is into the ponytail.

Now I take the hair that is looped and pull it upwards towards her head. This makes a circle shape in her hair secure this with a clear small elastic.

Below is the hair after I have pulled the loop upwards.

Now bobby pins become your best friend. I use bobby pins to put the hair where I want it as shown below. If you put the hair into a bobby pin and it looks to small put your finger in the loop and pull a little bit. You can also pull small amounts of hair and pull it to the other side and secure with bobby pins.
Below is the finished messy bun. If this doesn't make sense please ask me more questions.
Diagonal French Braid to Bun
Follow the post before for great 2nd day hairstyle

Now the difference is to take the end of the braid and wrap it around itself to make a bun.
If the bun doesn't lay how you want it then take bobby pins and move the around until you like the bun.

Below is the side view.

Diagonal French Braid
This style was so easy and fun and litteraly took minutes to do.
I started by making a french braid starting at her left ear that went diagonally towards the right side of her neck.

Above is the starting of the french braid.
Below is the back view of the french braid.

Make sure to braid all the way to the end of her hair.

When Mom's Out of Town

Just recently I was out of town and told my husband will you please just put our daughters hair into a ponytail for school. I figured this would be the easiest for him.
This hairstyle is no glamour do, but it means the world to me. I came home and got showed these fun and cute pictures. All this style is, is a plain ponytail.
My husband took pictures of his hairstyle to share. He took pictures of the front side and back of this style.
I could not be married to a better man and I just wanted to share this fun story with everyone.

Below is the back view

French braids to Sides Up

I started this style by making a diagonal thin french braid. I braided a little ways down and secured with an elastic.

Then I made a 2nd french braid that lays parallel to the first.

Then take the sides and pull them up over the top of the braids.

I finished off the style by wrapping her hair around the elastic.

Side view

Back view

Poof, Braids, and into Ponytail

First off I made a triangle shaped poof in the front of her head. This is going to be the line you use for the french braids.

Make a thin french braid along the poof line along both sides as show below. Secure the ends with elastics.

I then put the all the hair into a ponytail. To finish it off I wrapped some of her hair around the ponytail.

Below side view

Infant Bows (How to get them to stay)
I just wanted to share some fun and important information I should have shared a long time ago. There is a website mom-stuff that gives better instructions but below is my attempt.
For those of you that don't know this well known secret but little hair blows will stick to your infants head with Karo Syrup. This product is great and doesn't hurt your infant and works better than the oil based products such as KY jelly. The Karo Syrup also washes out easily.

Question 16
t has left a new comment on your post "Question 15":
I have looked all over the area where we live and can not find the ringlet curling iron that you have in your post, or any ringlet curling iron at all. I do love the curls it makes to.
I have not looked locally for this curling iron since I purchased it over 5 years ago. I did some research on the Internet and it looks like they have a new model out. I have included a link to Target which has the new version, or just go onto google and type in "Conair Instant Heat Spiral Styler with Curl Press" that will give you a list of places to purchase a similar curling iron.
Walmart also has this exact curling iron on their website. http://www.walmart.com/ip/Conair-Instant-Heat-Spiral-Styler-Curling-Iron/3999274?wmlspartner=GPA&sourceid=44444444440281551375
Angel Braid Bangs Back

My daughter is going through the "I want my hair down phase"
This one is very similar to the other Angel Braid we did before except this one is keeping her bangs back and we added ringlets.
This braid is really easy once you understand how its done. Start the braid as you would a french braid. The only difference is you are only going to add hair from one side. On her I made the 3 sections and then only picked up hair from the right side each time.

Once the braid is in place I made ringlets with my straightening iron.


Question 15
D has left a new comment on your post "Curls Twists and Fancy Fun":
super cute such nice ringlets, too. How long do they stay in her hair?
I wash my daughters hair every other day, so as far as how long they stay in. I have had them last beautifully for 2 days with just a few touch ups on the 2nd day. This is however only when I use the ringlet curling iron . If I do her ringlets with a straightening iron they only last through the day.
Braided Bangs 2

Another braid to hold her bangs back.
This one is hard to see the braid but it is french braided slightly diagonal with only about 4 or 5 times I pulled hair back. Then I made sure her hair laid over the braid.

Braided Bangs 1

Here is 1 of 2 braided bangs back to help while growing her bangs out.
All I did was a simple small french braid in a slight diagonal. I braided the hair almost all the way down and secured with an elastic.

Curls Twists and Fancy Fun

This style is so simple and yet so cute.
First I made ringlets all over her hair.

Then I made very small twists with her hair and secured them with small bobbie pins. If your daughters have thin hair then you can cross 2 bobbie pins to make the twists stay.

Next make some more small twists on the other side as shown below.

The fun part of this style is you can cross and mix the twists however you want.


Subscribe to:
Posts (Atom)