Sponge Curlers


My new work schedule has changed a lot lately so our hairstyles have gotten really simple.  I bathed my daughter the other night and she asked for curlers put in her hair.  I use sponge curlers since I think they are easier to sleep in.

To get big curls I made large parts and wrapped them tightly around the curlers.
When she woke up the next morning I took a blow dryer to make sure all the hair was dry.
Shown below I took one curler out to show the large curls these made.
Take out all of the curlers
She asked for a ribbon headband.  Since we all know these don't stay in all day by themselves.  I took a small amount of hair just above each ear and singled it out.  Then place the ribbon behind that hair.  Pull the small amount of hair that was left out across the ribbon and take another small amount of hair on the opposite side of the ribbon and secure with an elastic. (SHOWN BELOW).
Take both sides of the hair and secure together at the base of her head.

Updo Fun for HOT Days!


I apologize for the lack of posts we have been out of town for the last week.  We played as a family all last week in the warm sun at the lake here is one of the hairstyles.  As I have mentioned before my daughter hates to have her hair down when its hot.

I started by making 2 french braids up her hair starting from the bottom of her head (as shown below)

Then I took a small amount of hair and pulled it just above her ear (this was to keep her bangs out of her face).  I left a small amount of hair just above her hair along the face line.  This will be used to cover the elastic. (see picture below.)
Pull all the remaining hair except the small amount of hair along the hair line into a ponytail.
Shown below is the hair left out of the ponytail temporarily.

Take the remaining hair and pull it across the elastic and secure it around the ponytail.
Then make a messy bun with all the hair. 

PigTails

To give a little history on the pigtails.  I actually dislike the look of pigtails.  My mom will always put my daughters hair in pigtails when she has her because I won't.  My daughter loves them so this is my version of the pigtails.

I started by pulling her bangs  to the side ( her bangs are still growing out)  I gave them a side swoop 
Then make your center part.
Here is were I added a little flair.  I pulled a small amount of hair and secured it with an elastic (as shown below)  I made a pull thru twist in it. and then pulled the all the remaining hair into a ponytail.
The back view below
Then I curled her pigtails into ringlets.


GiveAway Winners

The Winners of our first giveaway for the SideWinders http://hairholders.com/ are

#6 IAguirre

and

#14 Staci Stephenson

Will you please email me at nosleeptilldawn@hotmail.com with  your address so I can get them shipped to you.

Thanks to everyone who entered. 
Keep watching for more chances to win other fun hair accessories.

Another Toddler SideWinder Fun

A reminder to anyone who wants to enter today is the last day before we give away 2 sets of SideWinders

My 3 year old brings me the sidewinders everyday and wants them put in her hair. 
So here is another simple fun idea.


I made a zig-zag part in her hair and then made 2 ponytails and then added the sidewinders(http://www.hairholders.com/) in colors of pink and purple.  These were the 2 colors she picked. 

Sprucing up Plain old Braids


The older my daughter is getting the more she keeps telling me she wants quick styles.  I get tired of plain things in order to compromise between the 2 of us.  This is the style we came up with.
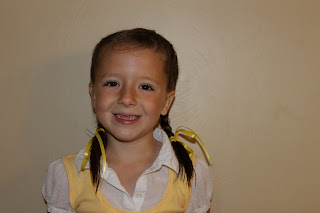
This is as simple as making 2 french braids the only change is that I added a yellow ribbon. 

I made this really simple and took a yellow ribbon and folded it in half.  I added one side of the ribbon to one of the 3 pieces of hair and added another to 1 of the other pieces of hair.  The 3 strand of hair is by itself. 
Then frenchbraid to the end.  As the braid loosens through the day the ribbon shows more. 

Once the braids were done I tied them around the ponytail holders and made a bow.

SideWinders Giveaway

The Newest Hair Accessory and Our First Ever Giveaway
Presenting SideWinders


I am so excited about these fun new hair accessories!

They are called Sidewinder Hair Holders. My daughters and I just love them! Over the last week I have done a couple of different hairstyles on both my little girl and my toddler to show you how much fun they are. These accessories are so easy and fun to use. My daughters got so many compliments.

I will be giving away, two sets to two lucky winners. This giveaway will run for 1 week and close on Tuesday May 18, 2010.
For more info on Sidewinders and to watch a video on how to put the Sidewinder in go to http://www.hairholders.com./

For a chance to win some Sidewinders of your own check out the website http://www.hairholders.com/. Leave a comment under giveaway on my blog or on my facebook page tell me what your favorite 2-color combination is.

Toddler SideWinders' Fun

Toddler fun with SideWinders from http://hairholders.com/ 
The Sidewinder accessories have been so much fun.  I did my daughters hair for our town celebration.  She got so many compliments on her hair. 
This fun hairstyle fits my toddler's personality perfectly.

I made 3 small ponytails across the front of her hair as shown below.  Then I took pink and clear sidewinders (http://hairholders.com/) click on the link to order or to show you how to use them.  I wrapped the sidewinders around all 3 ponytails. 

SideWinder Hair Holders

Recently we came across the latest, funnest, and easiest hair accessory.  The website if anyone is interested in these is http://www.hairholders.com/.    Keep watching my hairblog because YES for the first time in The Wright Hair history we are doing a giveaway.  We will be giving away some Sidewinders.

 The SideWinders added some flare to this simple style.  We picked the colors clear and green because my daughters school colors are blue and green.  She had so much blue on that we wanted to emphasize the green.

I first made a zigzag part and then made a simple, thin french braid .  Do this to both sides as shown below.  I left some hair out above her ears. 
Once the french braid is done I added the SideWinders I mixed my colors so I used one green and one clear instead of 2 of the same color (for instructions on where to buy or how to use go to http://hairholders.com/)

Do this to both sides.  *NOTE*  if your daughter has thin hair or you don't use a lot of hair then use a clear elastic at the end to keep sidewinder in place.
Once the sidewinders are in place then I used a clear elastic to pull them together in the middle of her hair.

Rolls


My mom used to do this to my hair when I was little.  I have alway put off doing it for that reason.  I was in disneyland and say a cute little girl with a similar hairstyle so I figured at that point why not share it. 
This style is so easy to do especially if it is wet. 

Start on one side and start rolling adding hair from the outside similar to adding hair with braids but from only one side.  The style is as simple as that.  Do it to both sides and secure in the center with an elastic. 


If you like accessories add a bow or flower. 


Felt Flower with Ringlets

We have a website that we just love that is for mom's of all walks of life.  The website http://www.mom-stuff.com/ just posted how to make your own felt flowers this is one of them.
The link to the flowers is http://www.mom-stuff.com/public/272.cfm
All I did for this cute simple style was used the ringlet curling iron shown below and made loose curls then we put the barrette in her hair. 

Princess Braids

This braid is very fun and simple. The most difficult part is getting it to stay tight. You start like a normal braid the only difference is that when you go to add the hair on the downward side leave the folded across hair out and add the new hair only.

I did this on both sides of her hair and then secured them together with an elastic.